Setup
This tutorial was originally created for an earlier version of Brobot but has been updated for version 1.1.0. The original code examples are available in documentation versions 1.0.6 and 1.0.7.
Start a new Spring Boot Project
A Spring Boot project can be created with the Spring Initializr or directly in Intellij or Spring Tools 4, which works with Eclipse, Visual Studio Code, and Atom IDE.
Add the Brobot Library as a Dependency
Maven:
<dependency>
  <groupId>io.github.jspinak</groupId>
  <artifactId>brobot</artifactId>
  <version>1.1.0</version>
</dependency>
Gradle:
implementation 'io.github.jspinak:brobot:1.1.0'
Note that Brobot 1.1.0 requires Java 21 or later. The full build.gradle file should look similar to this:
plugins {
    id 'org.springframework.boot' version '2.6.2'
    id 'io.spring.dependency-management' version '1.0.11.RELEASE'
    id 'java'
}

group = 'com.example'
version = '0.0.1-SNAPSHOT'
sourceCompatibility = '14'

configurations {
    compileOnly {
        extendsFrom annotationProcessor
    }
}

repositories {
    mavenCentral()
}

dependencies {
    // Brobot 1.1.0+ includes Spring Boot, Lombok, SLF4J, and SikuliX as transitive dependencies
    implementation 'io.github.jspinak:brobot:1.1.0'

    // Lombok annotation processor still needed for compilation
    annotationProcessor 'org.projectlombok:lombok:1.18.32'

    // Testing
    testImplementation 'org.springframework.boot:spring-boot-starter-test'
}
Create Folders for Images
Create a folder called images.sikuli to hold the images
used by your Brobot application to manipulate GUI elements.
Create a folder called labeledImages to store images captured
by your Brobot application. This folder holds the output of your application.
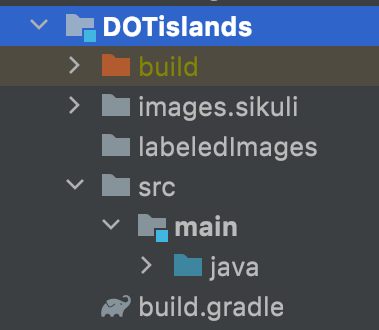
The folder structure should look like this (the build folder will be created automatically if using Gradle):

Capture Pattern Images
For best pattern matching results, use your OS's native screenshot tool:
- Windows: Windows Snipping Tool (Win+Shift+S) - achieves 95-100% match rates
- macOS: Built-in screenshot (Cmd+Shift+4)
- Linux: GNOME Screenshot or Spectacle
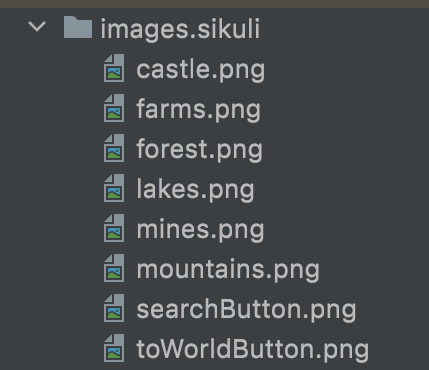
Save your captured patterns with the following names in the 'images' folder:

To follow the tutorial to prepare mock runs, the captured images can be of anything. While the Sikuli IDE can be used to test similarity scores, the native OS screenshot tools produce cleaner patterns with better match rates.
Preparing your Demo for Live RunsIf you also wish to do live runs with the demo, you'll have to save these specific images in the game:
This will be "Castle of" or "Castillo de", etc., depending on
the language setting.
The cutouts don't have to be exactly the same, just as close as possible. Keep in mind that Brobot will look for the exact size; if you resize the emulator you will have to cut and save the images again. In a production Brobot application you should have code that checks the position and size of the application window (here, the emulator) and resizes and repositions it if necessary.